


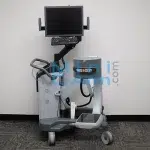
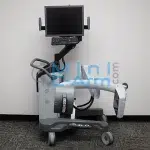
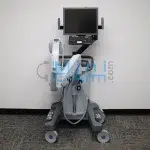
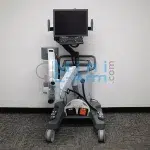
The Orthoscan FD is the first mini C-arm system to feature flat detector technology, providing 2k x 1.5k resolution in a compact, lightweight design. Ideal for orthopedic surgery, sports medicine, and outpatient imaging, it delivers exceptional image quality with lower radiation dose and intuitive, sterile field controls.
Contact Minicarm.com today for purchase, rental, or financing options.
1 (800) 643-2998
Delivers high-resolution, distortion-free imaging with a 2k x 1.5k pixel array. Ideal for extremity views during orthopedic and outpatient procedures.
One of the thinnest mini C-arms available, the Orthoscan FD is easy to position in tight OR spaces and surgical suites. Improves workflow without sacrificing image quality.
Convenient tube-head controls on both sides allow surgeons to activate imaging, save images, and print — all while maintaining a sterile field.
High-brightness display with wide viewing angle and adjustable arm. Enables clear image review and ergonomic positioning during cases.
Store large case volumes locally, with USB export and optional Wi-Fi connectivity for PACS integration (DICOM 3.0 compliant).
Monoblock design offers consistent performance with fast setup and warm-up time.
| Feature | Specification |
|---|---|
| Flat Detector | CMOS flat panel, 15 x 12 cm (150 mm x 120 mm), 75µ pixel pitch |
| Resolution | 2k x 1.5k (2048 x 1536 pixels) |
| X-Ray Source | Embedded monoblock, 40–75 kVp, 0.04–0.16 mA |
| Image Storage | Up to 12,000 images; USB 2.0 export; DICOM 3.0 compliant |
| Display | 20.1” LCD monitor, 1000 cd/m² brightness, adjustable arm |
| Controls | Bilateral sterile field tube-head controls |
| C-Arm Rotation | 150° orbital rotation, 430° pivot, 320° lateral, 34” vertical travel |
| Footswitch Options | Wired and wireless multi-function foot pedal support |
| Connectivity | DICOM 3.0, PACS-ready, optional Wi-Fi, EMR image link capable |
| Software Features | Edge enhancement, adaptive & manual noise suppression, snapshot & cine loop recording |
| Weight & Size | Approx. 400 lbs; 27” x 33” footprint |
| Power Requirements | 100–240 VAC, 50/60 Hz |
The Orthoscan FD Mini C-Arm is purpose-built for high-precision extremity imaging across a range of medical environments. Its flat detector and compact design make it ideal for facilities seeking excellent image quality, efficient workflow, and reduced radiation exposure.
We offer fully refurbished Orthoscan FD Mini C-Arm systems in stock and ready to ship – backed by warranty and nationwide support.
Typical Price Range: $30,000 – $40,000
Prices vary based on system condition, year of manufacture, included accessories, and warranty length.
Learn more about financing options.
Pricing varies by configuration. Contact us for an exact quote.
When you purchase or lease from Minicarm.com, your refurbished Orthoscan FD Mini C-Arm comes backed by industry-leading support – before and after installation.
Prices typically range from $30,000 to $40,000, depending on the unit’s condition, configuration, included accessories, and warranty coverage.
Didn’t find the answer to your question? Contact Us for help.
0:04 – Hey guys, I'm Christopher Bacon, the founder of OrthoScan and the president of Minicarm.com.
0:08 – Today we're going to go over the OrthoScan FD, which is the first flat panel system.
0:17 – To turn it on, just press the power button up here on top of the chassis.
0:23 – It takes about a minute or so for it to boot up.
0:27 – We'll go over some articulation of the C-arm.
0:30 – This is about how low it goes.
0:33 – And the height.
0:35 – And here’s our orbital rotation.
0:45 – And the wig-wag too.
0:52 – All right, so we're going to use our hand phantom to do some imaging.
0:56 – There is a laser button up here that gives you crosshairs approximately in the middle of the field of view.
1:06 – As you can see, it takes approximately three seconds to get yourself a nice image.
1:11 – Please don’t just tap or you'll get an unsatisfactory image.
1:18 – Also wait approximately a second before you initiate another fluoroscopy.
1:24 – This gives the machine time to populate the last image hold area.
1:33 – Here we can see the two pad controls.
1:39 – X-ray.
1:41 – Rotate clockwise or counterclockwise.
1:45 – You can change the technique to go up or down.
1:49 – You can also tag your images.
1:54 – You can also print and save all your imaging.
1:58 – If you want to rotate the image, you can use the clockwise or counterclockwise image rotate buttons.
2:06 – You can also flip the image.
2:09 – It’s just a toggle.
2:12 – Negate changes it to look like an x-ray.
2:14 – You can change the edge.
2:17 – It changes the bone grain, basically.
2:21 – We usually keep it on low.
2:24 – When you're finished with the case, press Case Review.
2:30 – Here you can save specific images by using the arrows to navigate through.
2:39 – If you want to save this image, press the space bar so it says “Tagged.”
2:45 – Say you want to save this one as well.
2:49 – Then you can come down here and click Save All.
2:56 – And they’re saved.
2:58 – To review all the cases you have on the machine, press the Recall button.
3:04 – Press the Enter button to open it up.
3:08 – Then you can navigate through.
3:10 – You can print from here.
3:13 – You can send a DICOM.
3:16 – You can USB save them.
3:19 – When you're all done imaging and have your images saved, press the green power button.
3:25 – Wait for the fans to shut down.
3:27 – You’ll hear them shut down.
3:29 – Then unplug it from the wall.
3:31 – The reason you do this is to let Windows shut down properly.
3:37 – This is an overview of the OrthoScan FD.
3:40 – If you need sales or service, please give us a call at 800-643-2998.
3:44 – Or send us an email at info@minicarm.com.
3:47 – Thank you.
Minicarm.com is not affiliated with or endorsed by Orthoscan. All product names, logos, and trademarks are the property of their respective owners and used for identification purposes only.